Friday, 16 September 2016

Macro Photography - Work Diary

In today's lesson our taks was to shoot images as closely as we can, due to my camera not having the correct lens I borrowed a macro-camera from the college to shoot these images inside the studio. We had to focus on the individuals body part we wished to photograph, and capture this in clear detail, with no blur. I enjoyed doing this lesson as I like shooting images close-up, as I enjoy seeing all of the detail in these images below. 

Close Up-
(BEST IMAGE)


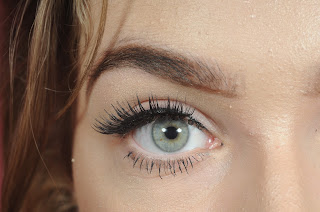
This image is my best of the day as by using the macro camera I gained an extremely close-up image of my subject's eye. You can easily see all details on the individuals face, and the focus is heavily on the eye due to the fierce green contrasting the plainer nude tones. I photographed this image in the studio, which allowed me to control the lighting specifically so I could achieve my ideal image. The camera settings when taking this image were an ISO- 200, a shutter speed of 1/2125, and an F - 8. I shot this image in the studio which allowed me to control the lighting more effectively, and get the precise amount of light I wanted in the photograph. 

Close Up-
(WORST IMAGE)


This is my worst image of the day as the angle of the image appears wonky; although I do like that you can see reflection in the eye I believe my other images are of better quality, as they're in the studio whereby I could control the lighting more effectively myself. I shot this photograph on ISO-720 F-4.5 and a shutter speed of 1/60. I would have liked this image if it was slightly lighter, I could have achieved this by adjusting my camera settings, making the shutter speed lower, or by making the aperture lower.


Progression:
Close up photography is the technique I would probably use more frequently in my images, as I enjoy taking these types of images, I would like to photograph these images inside, and outside the studio using a macro-camera. I could photograph images of flowers close up with a marco-camera inside the studio, and create a different meaning behind just plain 'flowers'.

Macro Photography - Straight Images

Close Up:
ISO- 200
Shutter Speed- 1/2125
F - 8
I like this image as the subjects eye is clearly in focus, as it'd central to the image . This demonstrates close up photography as I zoomed close in to the eye, so that you only focus on this feature, and no others on the face. The pale green colour of the eye also contrasts the dark brown hair, which allows the eye to gain more attention too. 

ISO- 200
Shutter Speed- 1/2125
F - 8
I like this image as the subject appears to obtain a slightly menacing look, although you cannot see their full facial expression due to my close up technique which only allows me to focus on small areas (eye.) Perhaps in another shoot I could ask my subject to remover their glasses, although I believe this adds detail to the image. 

ISO- 200
Shutter Speed- 1/2125
F - 8
The lips are photographed close up in this image, with no detail in the background, allowing you to focus on them further. I like how the lips are not completely smooth as this adds texture to the image, moreover the braces add texture and work effectively with this too. 

ISO- 200
Shutter Speed- 1/2125
F - 8
In this image the eye is shot close up, I could have perhaps photographed this even closer up to gain more detail of within the eye itself, and less detail of the face. Furthermore, I like the curve of the left hand side of the face, as it's slightly blurred and allows your eyes to travel round to the main part of the image- the eye. 

Macro Photography - Image Bank


This image captures water droplets on a leaf extremely close up, allowing us to see on a microscopic scale what this looks like. I like how in the image the droplets appear to be circular transparent balls, which are caught on each prick of the leaf. I would like to recreate an image similar to this as it allows us to view everyday scenarios close up, like we've never seen them before.

This image allows us to view a wasp extremely close up, as usually even when they're close to us many people would run away; therefore, in this image we get to see them in more detail than we would usually. The end of the stinger looks glossy and smooth, contrasting the flower itself which looks slightly rougher. The bright colours in this image catch your eye, also the purple edges of the flower draw your eyes in, almost like a natural vignette.

This photograph again allows us to see everyday scenarios in a different, more detailed way. The air bubbles that surround the lemon make the image more interesting as it's evident they're both inside and outside the lemon. I also admire how the bubbles which are in the background are out of focus, making them appear like stars on a black sky. 

This image of a strawberry is interesting as to us the normal surface of strawberries is smooth and 'clean' looking; however, this image creates a sticky/dirty texture to the strawberry. Moreover, I admire how the small hairs on the strawberry are viewable, this again adds texture to the overall outcome of the image. I would like to try and create an image similar to this in the studio. 

This image appears slightly surreal, as the cold colours contrast the sharp, warm red of the ladybird. This image creates the atmosphere that it's photographed in winter due to the cold blue colours; however ladybirds are primarily seen in summer, therefore this creates questions in the viewers head. I would like to be able to photograph an image similar to this, I would have to be very patient and wait a long time to capture a picture like this. 

This image is endearing as the insects appear 'cute', due to their big eyes. They appear to be peering over a leaf, which make suggest they;re trying to hide? This image allows us to see everyday insects in a close-up way, which we wouldn't normally. I would like to recreate an image like this; however I would need to purchase my own macro-lens, as this would take me a long time- therefore I'd have to complete this task at home. 

Macro Photography - Definition Post

Close up photography-  these shots are close up images, with frame tightly an object or individual. This technique is often used in portraiture, as you focus solely on one object/person, this can also be known as macrophotography.
Below is the lens which would be used on a camera to photograph close up images:
Manual focus is used in close-up photography in order to attempt and focus on everything in the image, and ensure all is clear. If you do not have a macro lens (a lens specific for close-up photography), then you can stand further back from your subject and zoom in, in order to allow you lens to focus on all of the image, as your lens would not be capable of this if you were standing too close to the subject. Despite this, if you do obtain a macro lens then you can get as close as you like to the subject. Some close-up images have blurred backgrounds, with the focus only on the subject.


The image above is an example of a close-up image, as all of the subject is in focus. This image allows us to see the object in a way which we ay not see in everyday life. 

Thursday, 15 September 2016

Camera Settings

Main aperture settings: 2.8, 4, 5.6, 8, 11, 16, 22, 32, 64.


The lower the aperture setting, the more light this lets into the image.


Main seconds: 30", 15", 8", 4", 2", 1", 1/2, 1/4, 1/8, 1/15, 1/30, 1/60, 1/125, 1/250, 1/500, 1/1000, 1/2000

The relationship between aperture and shutter speed involves lighting. The lower the aperture, the more light you let into the lens meaning that you need to make the shutter speed quicker, in order to capture the image without it being overexposed. Contrastingly, the higher the aperture the less light you're allowing into the lens, meaning that the shutter speed must be longer in order to allow more time for light to make its way into the lens. 
If you obtain a low F stop number, then the depth of field will be shallow, with background blur; whereas contrastingly if you have a high F stop number you'll obtain a wide depth of field, with less blur. 


The ISO of as camera is important as it's dependant on the light, if it's dark you'd use a higher ISO although this can make the image slightly grainy. 
A large aperture means a low f stop, which results in a narrow depth of field, whereas a small aperture means a higher f stop and a wide depth of field. 


Tuesday, 13 September 2016

Critical and Contextual Analysis

Fine art photography- there's no specific definition for this however, this refers to a category of photographs, created in correspondence with the creative vision of the cameraman; these images are usually abstract and surreal. The products must be appreciated for their imaginative, aesthetic or intellectual content. 


The image above is an example of fine art photography, as the vision of the photographer is clearly shown in the image above. The photograph is slightly surreal, and abstract which fits with the fine art definition, this is shown through the umbrella being on the womans head, upside-down which would be physically impossible to occur in real life. The overall atmosphere of this image is spooky, due to the fact you cannot see the individuals face, which is covered by hair. Moreover, the woman is wearing an old fashioned dress, which adds to the effect of the image being 'haunted'.


Mendel Grossman:


Connotation- an implied meaning 
Denotation- the literal meaning of the photograph 

Bathe's theory involves the...

  1. Studium- this is an element which originally grabs your attention, this can range from clothes, colours, or a pose. 
  2. Punctum- a small detail, which you wouldn't expect in the image (e.g. a portrait with a bee on the woman's chest)
Mendel was a Jewish photographer, he photographed Jews in slums on the streets. When world war two broke out, he photographed many images of Jewish people, and the struggles they faced. Him, and his family were removed to a ghetto, whereby he photographed them daily as they moved further to death. 

http://www.holocaustresearchproject.org/ghettos/grossman.html


The image above is photographed by Mendel Grossman in the 1940's, the two children appear to be playing innocently; however, they're acting out something which is real, this makes the image have dark underlying reasonsoning- the young boy in the uniform is smiling showing how he doesn't understand the significance of what he is demonstrating, again highlighting their innocence. This photograph is taken in Lodz, which is a region in Poland, where Jews were sent to ghetto camps, therefore we can deduce that boy of the boys are Jews, as they're both in the camp. The boy who is wearing the uniform is displaying a badge on his arm, this is the punctum, as it shows hierarchy and power, as without this badge it would just be a plain, ordinary uniform. Additionally, the badge represents a section of Jewish people who patrolled the other Jews in this region, in order to keep order, as otherwise it would be a Nazi badge, and not the badge that it is if it was German individuals in control in this area. Moreover, the baton is a punctum due to the fact it highlights power, control, and punishment- it represents the child in the uniform controlling the other child. The children may be acting out a scene they've seen happen to someone they know, this shows there's dark humour in the image; in the article it states how Grossman 'knew how to observe and perceive what was happening around him', therefore it's easy to deduce that he saw this as a good opportunity to show how innocent the children, whom were being hurt, were. There's a clear fence around the boys in the background of the image, this may signify that both boys are together and united against the Nazi front; this also could mean that although one race may be 'in control/in power' (Nazi's) all humans are actually the same (Nazi and Jews), due to the fence showing they're in the same place- in contrast it also shows how the boys have constrictions and limitations on their behaviour. Due to the boys both playing in a hierarchical fashion (with one boy in charge of the other), this may highlight how they've been raised in a society whereby this is normal, and they believe this is the correct way to behave. This image was taken at a time when Jews had a stigma linked with them, therefore this is significant as to why Grossman may have photographed this image, and gives us an insight into his reasoning behind this photo, as Grossman wanted to document how badly Jews were treated in this time period. The black and white colouring of the image reflects the stigma towards the Jews, as it shows everything for them was bleak, and dull as they were effectively being held prisoners. The tones of the uniforms again highlights the difference between the two boys as the child in uniform has a darker uniform, whereas the other boy is in a more lighter coloured uniform- this may reflect the difference in how innocent the two boys are. 
By me researching information surrounding this image it has helped me gain knowledge of life in the Jewish getto, this is due to Grossman's photographs which give e huge insight into the first hand experience of individuals in this particular time period (1940's). Corresponding with this, I have learnt how individuals persevered and wouldn't give up in their fight against the Germans, demonstrated by Grossman as he risks his life merely to photograph these images in order to document the atrocities that occurred towards Jews. In the article it is stated that Grossman had 'found his mission'.

Above is a mind map I created in a group in class which helped me gather some of my ideas for the essay above.

Monday, 12 September 2016

Location Portraiture - Work Diary

In today's lesson our task was to photograph 5 different images in 5 different locations, in the style of Alec Soth's image 'from here to there'. We had to ensure both the individual in the image, and the background were considered.
A tripod was essential for us to use in today's lesson as this allowed for no camera movement, and it ensured we got a sharp focus on the eyes of the individual. We were encouraged to form a relationship with the individuals we we're photographing, so they felt at ease. 

Best Image:

This is my best image of the day due to the fact it's evident I built a relationship with the individual as they're smiling and at ease. I also like how the subject is in the middle of the building in the background, this image gives off an urban feel overall as the building and walls are dirty, and dark. The lines on the building in the background are straight in my image, I ensured they were straight in order to get a cleaner overall look. The shutter speed I used was 1/200, with an F stop of 13 and an ISO of 400. I used a fast shutter speed (1/200) so I could capture the majority of the image in focus, with the eyes vital to this.
Moreover, I like the colours in my image as the yellow stands out slightly compared to the washed out browns and reds. 

Worst Image:

This is my worst photograph of the day, as I used the wrong camera settings which caused the image to be greatly over-exposed. The reasoning behind me using the wrong camera settings initially is because we were initially inside in a darker area, therefore when we came outside the F stop needed to be increased. I shot this image on the camera settings ISO- 400, F- 5.6, and a shutter speed of- 1/200. The F stop is extremely low, I later increased this to F stop 13 which suited the lighting situation much better (as shown in my best image of the day, which was too shot on F stop 13.) I like the positioning of the individual, and the colouring of their jet black jacket, the only thing which brings down the quality of my image is the incorrect camera settings, resulting in over-exposure. 


Progression:
For my personal project I would consider using the technique of location portraiture, as I could photograph different people in different environments; these could include build-up city areas, or country-side landscapes. 
If I was to shoot any of my images again I would ensure I adjusted my camera settings when changing from different environments, to ensure I didn't get an over-exposed, or an under-exposed image again.