Tuesday 27 September 2016

Multiple Exposure - Work Diary

In today's lesson our task was to capture images outside the studio of multiple exposure. I shot all my images on the camera settings of ISO 200, a shutter speed of 1/100, and an f stop of 5.6. We watched a video on how to change our camera settings to fit the 'double exposure' effect, however we decided to photograph two separate images, and then combine them in photoshop as I didn't have all of the different camera settings needed on my camera- despite this, I could and did change my exposure and spot metering camera settings. In order to then edit my images I opened the photos in photoshop, and pulled my pictures on top of each other, whilst resizing them when needed. Once I did this I then changed the photoshop settings from 'normal' to 'screen'. 
I enjoyed this lesson, as I like the outcome of my images despite them all looking 'green' as I photographed images of trees to go over the top of them, as this would fit my project theme.

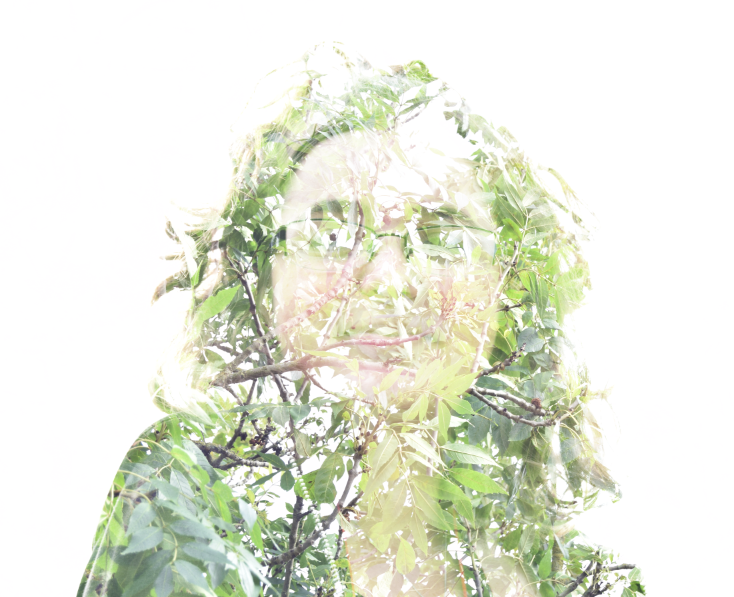
My best image of the day:


This image is my best of the day as you can clearly see how the tree fits into the individual, the two imaged merge well together. The yellow writing on my subjects t-shirt jumps out of the image, when contrasted with the green leaves. Additionally, the gap in the individual's head may suggest that she is missing something mentally stimulating, which she cannot have (e.g. education.) The branches across the subjects face appear to be slightly red, this almost looks like veins across her face, this may imply that nature is in our veins, and we need it to survive. The subject's coat appears to be made out of leaves, I like how this looks, as it appears to be realistic. 


My worst image of the day:
The above image is my worst photograph of the day. Although I do think the colours fit the individual well, the background is not completely white, this would have been due to the blue sky coming through on one of the images slightly, then allowing the leaves image to be seen. In order to correct this I would have to reshoot this image again, this image ensuring that the background is perfectly white, in order to avoid the image of the leaves coming through on the background. Additionally, the leaves appear slightly too dark, I could have changed this using the curves tool on photoshop, or the brightness tool, again on photoshop- or I could have initially edited my camera settings by making the f stop higher, so less light would be allowed into the camera lens, and then consequently in the image. 


Progression:
Overall, I believe my shoot went well, I would like to use this technique in my project, as I can show how individuals and nature combine to one; moreover, I would photograph images of trees and buildings to merge with the image of the individual. When using this technique in my project I would ensure my camera settings were changed to fit the situation, in order to control how much light I let into my images. Moreover, I would also like to try shoot the images of the individuals in the studio, again so I can control the lightning to a higher degree, and ensure the background is completely white. 

Multiple Exposure - Straight Images


Camera settings of both the individual, and the tree:
ISO- 200
F - 5.6
Shutter Speed- 1/100


Camera settings of both the individual, and the tree:
ISO- 200
F - 5.6
Shutter Speed- 1/100

Camera settings of both the individual, and the leaves:
ISO- 200
F - 5.6
Shutter Speed- 1/100


Camera settings of both the individual, and the tree:
ISO- 200
F - 5.6
Shutter Speed- 1/100
Camera settings of both the individual, and the tree:
ISO- 200
F - 5.6
Shutter Speed- 1/100

I also experimented with changing my images into black, and white however I preferred the coloured versions, therefore I kept them as my straight images. The images below are my experimentations when using the black and white tool. 

Camera settings of both the individual, and the tree:
ISO- 200
F - 5.6
Shutter Speed- 1/100


Camera settings of both the individual, and the tree:
ISO- 200
F - 5.6
Shutter Speed- 1/100

Multiple Exposure - Image Bank

This image is extremely interesting as the clouds which make up the individual appear to be overtaking her thoughts, this implies that she may be in confusion, or over-thinking. I admire the black and white colour of the above image, as this highlights the definition within the clouds, and the female's face. I also admire how the viewer can clearly see the shape of the female, due to the perfectly white background against the darker tone of the girl.

The above image inspires me, as the building is placed vertically which is unusual, and uncommon. The different lengths of the pillars on the building make up the shape of the females head. The individual's hair looks like trees/roots which the building is built upon. I would like to attempt to recreate an image similar to this when I shoot my images, as it interests me how the pillars add to the shape of the head, to do this I would have to rotate my image in photoshop.

This image fits my nature theme as the hand is almost simulating the 'hand of nature' due to the hand consisting of leaves. This image appears to be not as realistic as some of the other images above, due to the white layer which is over the top of the leaves, therefore it's easy to deduce that this image was edited in photoshop. I could use tho image as inspiration for my project, it would also  allow me to include this technique in my project. 

This image is in colour which is different to the images above which are all in black and white. The woman's skin on her face appears to be flakey, like it's cracking, this adds texture to the image overall. The two separate images of the tree, and the woman appear to be extremely well merged here, this shows it was highly likely to be edited on photoshop. Moreover, the tree appears as though it's breaking through the woman's skin, I would like to attempt something similar to this, however I'm not sure how I would edit my image to achieve a similar outcome in photoshop. 

This image gives off the impression it's cold, and crisp due to the cool colours used (e.g. blues.) I admire how the cliff top which breaks the woman's face in half, appears as though it's a sharp jaw line, this adds character to the image. You cannot see the woman's skin in this image, only the image of the landscape consumes her face, this may suggest ambiguity about who the woman is. 

The black and white colours of this image help highlight the contrast in the different tones which are held in this photo. The two images consist of a boy, and an urban landscape, this would fit my theme well as I'm exploring nature, both man-made and natural. The boys expression is blank; the fact that we can only see one of his eye may suggest that the boy is blind, or that doesn't like what he sees in his environment reflected in his blank expression. 

Multiple Exposure - Definition Post

Definition: Multiple exposure is the technique of merging two, or more images into one in order to create an overall image. The different exposures of the image can vary, which can make one image more prominent than the other in the overall effect.

Equipment needed:
Tripod
Camera
Subject to shoot
Objects to shoot

In the days where digital cameras were not present, you would use a film camera, this would involve the individual taking an image, without rewinding the film, and taking another image on top of this. 

To create the multiple exposure images, you can either set your camera settings to 'double exposure', or if your camera does not have this setting you can take two separate images, and merge them together in photoshop in order to create your overall photograph. 

How to get the correct camera settings:
To change your camera settings in order to gain the 'double exposure' on a DSLR, you must click menu and turn off the auto gain this will help make your images lighter. Next, you must change your exposure to either 2 shots or more so your camera will only capture the subject not the background, whilst turning on your multiple exposure. Then, turn your camera onto 'spot metering mode' and change your camera into aperture priority so you can select your own f number. This will enable your background to be maxed out white, meaning that it's 'perfectly' white.

How to create these images in photoshop:
In order to create this style of image in photoshop you must open your images in photoshop, whilst pulling your pictures on top of each other , whilst resizing if needed. Once you've done this you must change the photoshop setting from 'normal' to 'screen'.

The image above is an example of the technique multiple-exposure. Two images would have been photographed, one of the tree, and the other of the mans face. The photographer would have edited this image on photoshop, in order just to have the face as part of the image, they would have done this by opening their images in photoshop, and pulling them on top of each other , whilst resizing if they needed. Once they had completed this they would have changed the photoshop setting from 'normal' to 'screen'. This image portrays the technique of multiple exposure effectively, as you can clearly see two images merged into one.


Multiple Flash - Work Diary

In today's lesson our task was to capture images focusing on the technique of 'multiple flash'. We shot our images in the studio with the following equipment: a light meter, a tripod, a camera, a subject to photograph, a snoot and a studio light. 
We used our light meter to measure the camera settings we should be using, all of my images were shot on a shutter speed of 6", and F stop of 16, and an ISO of 200.
Prior to taking the photographs I was excited to explore this technique; however once I got into the studio I didn't enjoy it as much as I thought I would. I like the movement in my images, however the outcome overall is not as effective as I would have liked, as some of my images are over-saturated, and the background's are lighter than I wanted- I attempted to edit my images on photoshop in order to improve them. 


Best image of the day: 

This is one of my better images of the day, as you can clearly see a lot of movement within the image. Despite this, I do not like that the central image of the subject as is slightly over exposed, even though I attempted to edit this. This image does clearly explore the technique of multiple flash, as you can see many different stages. I shot the above image on ISO 200, with an F stop of 16, and a shutter speed of 6". I believe these were the correct camera settings, apart from the F stop, I could have possibly lowered this slightly in order to allow less light into the image, which may have prevented it from being over exposed slightly. 


Worst image of the day:

This image is one of my worst from this shoot. I like the concept of the image, but I do not like the outcome, due to me not getting the whole of the individual in the frame, if I had done this then I believe this would have been a strong image. I do admire how you can view both the side, and front profile of the subject, although this is blocked off at the end (far left.) If I was to reshoot this particular image I would ensure I had all of the individual in the frame, so you could view the starting and finishing pose. 


Progression:
Overall, I did not enjoy the shoot as my images didn't come out how I pictured them, I would not use this technique in my project proposal as I do not see how I could fit it in with my theme of nature. 
If I was to reshoot my images I would vary my camera settings, and just follow the ones on the light meter in order to experiment with various F stops, and shutter speeds. 


Multiple Flash - Straight Images

ISO- 200
F- 16
Shutter speed- 6"

ISO- 200
F- 16
Shutter speed- 6"

ISO- 200
F- 16
Shutter speed- 6"

ISO- 200
F- 16
Shutter speed- 6"

Multiple Flash - Image Bank

This image demonstrates the technique of multiple flash well, as the movement of the individual is evident. I like how you can see the woman's side profile, and her front profile. Moreover, I admire how the woman's expression is stern, with her eyes meeting the camera in the middle, and her eyes moving away as she turns her head further. This image would have used a shutter speed of possibly 6", with an F stop of 16.

The above image is interesting as it appears as though the girl has wings, due to the curved movement of her arms. The blue colours contrast the background well, as this allows them to stand out and be stronger. I would like to recreate an image similar to this as I believe it is eye catching. A tripod would have been used, in order to keep the body of the girl still and in focus, whilst her arms were moving. 

This image interests me as there's multiple positions of the woman's arms, which almost makes her appear as she obtains all of these numerous arms. The black and white effect is used, which helps highlight the movement of the arms. I would hope to recreate an image similar to this as I believe it is interesting and would help me demonstrate the technique of multiple flash effectively. 

This image is of an object, not an individual. The curved movement of the watch is great as it allows your eyes to follow the object smoothly. Moreover, all of the clock faces are in focus which allows us to deduce that a tripod was used. Additionally, the fact that not many of the clock faces overlap shows that this image was executed well. 

I like this image of the dancers, as you can see all of their movements combined with the various bright colours which contrast the black background. The movement of the arms at the top of the image appear like waves, due to their green-blue colours. I would like to recreate an image with somebody dancing, in order to view their different stages to their dance/movement overall.

Different expressions are pulled in this image, which indicate different emotions. Extremely low lighting is used in this image, which creates a further spooky atmosphere to the image, as you can only see the man, and how his expression changes. When shooting my images I would like to try and obtain an image whereby the subject changes expressions, my long shutter speed would allow me to do this, by letting the subject have time to change position. 

Multiple Flash - Definition Post

Equipment I would need:
Camera
Tripod
Soft box to place above the subject
Light meter


The multiple flash technique is where you fire the flaw several times, using an extremely slow shutter speed (3") in order to capture the movement. This can create a creepy atmosphere, as there can be several images of one individual in the photo. A dark background is used in order to capture the movement sharper, and help the colour of the object stand out, in contrast to the dark background. 


This image demonstrates the multiple flash technique, as you can see the movement of the girl's arms, this is due to the long exposure of the shutter speed, combined with the flash of the camera. A tripod was clearly used, otherwise the long shutter speed would have not allowed the girl's arms to be so clear. 

Tuesday 20 September 2016

Blur - Definition Post

Blurred images are when you can see the movement of rapidly moving objects in a still frame of a photograph. 

To create a blurred image a low shutter speed is needed (for example 1/3), you do not want your shutter speed to be too slow, otherwise the subject will be distorted, not blurred, this will not allow you to clearly see movement. 
A tripod is essential in order to achieve the best outcome, as you only want the blurred motion of the subject, not the frame in which your shooting in. Due to this a tripod is vital in order for there to be no movement of the camera. 


Equipment needed:

Tripod
Camera
Subjects to photograph


We were asked to analyse the above image in class; the above image is taken by the photographer Martin Klein, who often used documentary photography in order to portray his images (e.g. New York, Rome.) Blur is evident in this photograph in the mans foot. I admire this image as one man is in focus in the background, which contrasts with the man in the foreground, who is clearly in motion, and blurred. Through researching this image I found that the man who is in focus in the background was saying 'why are you taking photos of me?', this is captured in his slightly uncomfortable smile. This image clearly captures the hustle, and chaos of New York streets.  

Slow Sync - Work Diary

In today's lesson we were given the task of shooting slow sync images in the studio, we had to set up the lighting in the studio ourselves. I enjoyed shooting these images as I found it interesting seeing how the movement is trailed behind in orange shadows. I am happy with the outcome of my images, and I enjoyed the lesson overall, it made a change to be in the studio again.
The equipment I used for this shoot included: a light meter to help us set the camera settings, a tripod to keep the frame of the photo still, studio lights to get an effective 'flash' and lighting, and a subject to photography. 


Best Image from today:

ISO- 200
F- 5.6
Shutter speed- 1.6s

This image is my best one of the day, I made my subject dance, and you can see his previous position clearly before his new one, this shows the technique of 'slow sync' effectively as you can clearly see movement. I was able to capture the orange shadow in this image fundamentally due to the flash, and the slow shutter speed of 1.6s, additionally the black background enhanced this, and my subjects orange top jumps out from the background. 


Worst Image from today:

ISO- 200
F- 5.6
Shutter speed- 1.6s

This is my worst image of the day, as you can see the studio surroundings, also the subject is not properly in the frame, as the top of their head is cut out. The technique is also not explored effectively as there isn't much movement shown, therefore this doesn't meet the lessons objective. Moreover, I didn't inform my subject that I was about to take their photo, which is why they also look unprepared. 

Progression:
Although I enjoyed experimenting with this technique I would not use this in my project, as I do not think it would work effectively with my 'nature' theme, and due top my shoots being documentary photography I would not like to base many of my shoots in the studio, as my theme is 'nature' I wish to be outside. 

Slow Sync - Straight Images

ISO- 200
F- 5.6
Shutter speed- 1.6s

ISO- 200
F- 5.6
Shutter speed- 1.6s

ISO- 200
F- 5.6
Shutter speed- 1.6s

ISO- 200
F- 5.6
Shutter speed- 1.6s

ISO- 200
F- 5.6
Shutter speed- 1.6s

Slow Sync - Image Bank

This image has a creepy atmosphere, as it's a dark background, with a mysterious man in this, whom is smiling creepily. The man in the image almost appears 'ghost-like' due to the motion created from the flash, and this makes the viewer question what he is doing? 

I like the different colours that are created between the two cards, as this draws your eye into the image, despite everything but this and the ace card being in colour. I also admire how the card has changed, implying a magic trick is occurring, this would have been edited online in order to achieve this. Moreover, the smooth curved motion of the card's movement is something I would like to try execute in my shoot.

The red-pink colour of the dress stands out strongly from the black background. The movement of the individual's arm is what I believe is the key focus point of this image, as it's almost spiritual. Moreover, I admire how you can see where the dancers finish their move. You cannot really see the man until the end, whereas you can see the woman the whole way through, this may imply this dance is about/for her mainly. 

This image is similar to one I created last year in AS, whereby we used our phone lights to capture movement in the air. The continuous circles show that this man may be going on a journey, as they seem to never end and they intertwine with each other. The colours all work well together, and the background appears to be sloping off into the distance, or it appears to be shaking due to how the blur is working- this creates an uneasy atmosphere. 

This image is similar to the one above as the movement of the light is shown well, the red light also implies anger, this corresponds with the movement of the light itself, as it's not smooth but it's jagged. I would like to shoot an image like this, however I do not like the background in this image as I believe it slightly takes away attention from the subject and the lights. 

This image is a New York taxi, it captures the chaos well as all the lights are moving, but the car is in focus. This implies that the taxi is on a job, and is focus; whereas the rest of New York is rushing unknowingly. I would like to shoot an image similar to this of a car, at night, in order to capture the movement of city lights. A tripod was clearly used for this image, otherwise the car would not be completely in focused, but slightly blurred too. 

Slow Sync - Definition Post

What is slow sync flash?

Slow sync flash is an advanced term for using your flash, with a slow shutter speed. It allows you to keep your subject sharp while capturing motion/a dark background. This captures the ambient light, and its motion. You can chose to have the flash come at the beginning or the end of your exposure; if the flash comes at the beginning, this is known as 'front curtain', whereas if it's at the end it's known as the 'rear curtain'. A dark background is needed in order to capture more of the motion/ambience. 

Equipment needed:
Light source
Tripod
Subject
Light meter
Dark background
Snoot
Reflector 
Modelling light 
Monoblock studio lights  


In class we were given this image to analyse, and demonstrate to use how the slo sync technique works. You can evidently see how the young boy has moved and changed positions, this is due to the flash. The dark background allows the movement to be shown more clearly. The slow shutter speed allows the movement to be shown, as without this you would get a clear image, with all in focus. You can see the change in movement also through the boy being extremely bright and in focus where he finished, compared to the blurred movement behind him which is darker, as he has moved, therefore the camera didn't have much time to capture him in this stance, in comparison to how much time it had to capture, and light up him when he finishes his movement- this is also due to a lack of light. 

Blur - Work Diary

In today's lesson we were given the task of photographing images in the style of Klein, in order to explore the technique of 'blur'. I didn't like photographing this technique as I felt it made images appear 'untidy', and you couldn't prepare for what your outcomes would have been, as it was random. I experimented with various shutter speeds in order to gage which would be the best, as some were too quick (1/30), whereas others were too slow (4"). In all of my images I used a tripod to minimise any movement within the frame of the image, allowing me to focus on the subjects, in order to reduce the chances of any distortion occurring.


Best image from today:

ISO- 400
F- 29
Shutter speed- 1/20

This is my best photograph I took today, as I have an individual in focus, and one blurred slightly (likewise to Klein's image in my definition post for blur.) This image intrigues me as the subject in focus is looking away, into the distance implying he's thinking as he is not moving, whereas the lady behind is rushing past and he isn't paying any attention to this. Its evident I used a tripod to capture this image, as there's no movement from the frame, this was also due to my shutter speed of 1/20. The blur of the lady is in the centre of the image, this therefore draws your eyes into the image and allows you to focus solely on this. 


Worst image from today:

ISO-200
F- 25
Shutter speed- 1/10

This is my worst image of the day, as although blur is evident it doesn't seem as though I knew whether to capture just the movement of the feet, or the whole individuals. I like the idea of the effect of the wheels moving, however in this image you can't se any precise motion from them, it's mainly just the man who is blurred. Moreover, I do not like the background in this image as it appears to clutter the image too much which takes your focus of the blur technique. 

Progression: 
I would not use this technique in the project, as I do not believe I could incorporate this into my theme of 'nature'. I also do not like blurred images as they appear untidy and messy, I prefer crisp images with wide depths of field. 
If I was to reshoot my images again I would not go into Harlow town, I would perhaps go to a forest and shoot leaves falling, as I believe this would work better than merely taking images of peoples feet moving. 


Blur - Straight Images

ISO- 400
F- 29
Shutter speed- 1/20

ISO- 400
F- 20
Shutter speed- 1/20

ISO- 400
F- 20
Shutter speed- 1/20

ISO- 400
F- 22
Shutter speed- 1/15

ISO- 400
F- 16
Shutter speed- 1/40